Payee

  • How do I add/ upload my payees?
    1. Choose ‘Add a Payee’ in the Payee tab.
    2. Enter the:
      • Payee Short Name or nickname.
      • Payee Name - Add (Please note there is a limit of 35 characters here).
      • Address - Add (Please note there is a limit of 75 characters for the Beneficiary Address - additional address details should be typed into the 'Reason for Payment' box if required).
      • Country.
      • Currency.
    3. After choosing the country, you will then see an asterisk(*) beside the fields you need to complete in order to add a payee from that country. Fill in these fields.
    4. Complete Intermediary details if applicable.
    5. Enter a ‘Reason for Payment’ for this payee.
    6. Click save.

    Depending on your user permissions, the payee will either be sent to an Authoriser to authorise the payee, or you will be prompted to authorise the payee. (Please see How do I Authorise a Payee?).

    Did this answer your questions?

    Your answer helps us improve our Support Centre
    Thank you for your feedback!
  • How do I edit/amend a payee?
    1. Click on the ‘Payees’ tab on the left hand navigation to access the Payee page.
    2. On the Payees Panel, choose the payee you want to edit/amend. You can find the payee by checking the authorised drop down on the top right. Click on the payee you want to edit.
    3. You can then click the orange ‘Edit’ button on the Payee View Panel, which will give you the option to change the payee details, similar to entering a new Payee.
    4. Click Save. Depending on your user permissions, the payee will either be sent to an Authoriser to authorise the payee, or you will be prompted to authorise the payee edit. (Please see How do I Authorise a Payee? below).

    Did this answer your questions?

    Your answer helps us improve our Support Centre
    Thank you for your feedback!
  • How do I delete a payee?
    1. Click on the Payees tab on the left hand navigation to access the Payee page.
    2. On the Payees Panel, choose the payee you want to edit or delete. You can find the payee by checking the authorised drop down on the top right. Click on the payee you want to delete.
    3. You can then click the orange ‘delete’ button in the Payee View panel. Depending on your user permissions, the payee will either be sent to an Authoriser to authorise the payee deletion, or you will be prompted to authorise the deletion of the payee. (Please see How do I Authorise a Payee?).

    Did this answer your questions?

    Your answer helps us improve our Support Centre
    Thank you for your feedback!
  • How do I reject a payee addition/amendment?

    Choose the Payee awaiting Authorisation. Details will appear in the Payee Details screen. To reject a Payee addition or amendment, simply click on the ‘Reject’ button.

    Did this answer your questions?

    Your answer helps us improve our Support Centre
    Thank you for your feedback!
  • How do I Authorise a payee?

    For all changes to Payee details, you will need to use your Digipass.

    Authorising the addition/amendment of a Payee.

    DP550

    KeyCode older version device

    To authorise an addition or change to a Payee, you’ll need your Digipass. After you click on the Authorise button, a pop-up box will appear with the following instructions.

    1. Turn on your Digipass by pressing the red button.
    2. Enter Your 5 digit PIN and press the green button.
    3. A message ‘SELECT I or S’ is displayed on the Digipass screen.
    4. Press the ‘I’ button twice. ‘VERIFY’ is displayed on your Digipass screen.
    5. Press the green button to continue. ‘HASH’ is displayed on your Digipass screen. A unique code will be displayed on the screen beside the heading ‘Source’.
    6. Input the unique code displayed into your Digipass and press the green button. A Message Authentication Code (MAC) is displayed on the Digipass.
    7. Enter the MAC code in the MAC field onscreen and click ‘Verify’. You should then be prompted that you have successfully authorised the payee addition or amendment.

    DP250

    KeyCode device diagram

    1. Turn on your Digipass by pressing the Digipass Button button
    2. Enter your 5 digit PIN
    3. 'APPLI' appears on the screen of the Digipass
    4. Press 2
    5. Input the payee account number displayed on your FXPay screen into your Digipass
    6. A Message Authentication Code (MAC) is displayed on the Digipass
    7. Enter the MAC code in the MAC field displayed on FXPay screen, and click ‘VERIFY’ on FXPay

    You should then be advised that you have successfully authorised the payee addition or edit.

    Did this answer your questions?

    Your answer helps us improve our Support Centre
    Thank you for your feedback!
  • How do I Authorise the deletion of a payee?

    Authorising the deletion of a Payee.

    DP550
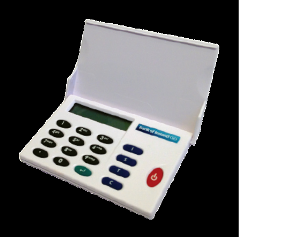
    KeyCode older version device

    To authorise the deletion of a Payee, click on the Payee awaiting deletion in the ‘Awaiting Authorisation’ list. After you click on the ‘Authorise’ button, a pop-up box will appear with the following instructions.

    1.Turn on your Digipass by pressing the red button.

    2.Enter Your 5 digit PIN and press the green button.

    3.A message ‘SELECT I or S’ is displayed on the Digipass screen. Press the ‘I’ button once. ‘VERIFY’ is displayed on your Digipass screen.

    4.Press the green button to continue. ‘LOGON’ is displayed on your Digipass screen. Press the green button to continue.

    5.A 6-digit One Time Password (OTP) is displayed on the screen.

    6.Enter this code into the One Time Password field onscreen and click ‘Verify’. You should then be prompted that you have successfully authorised the Payee deletion.

    DP250
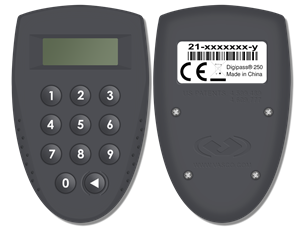
    KeyCode device diagram

    1.Turn on your Digipass by pressing the Digipass Button button

    2.Enter your 5 digit PIN

    3.‘APPLI’ appears on the screen of the Digipass

    4.Press 1

    5.A 6 digit One Time Password (OTP) is displayed on the Digipass screen

    6.Enter this code into the One Time Password field on the FXPay screen and click ‘VERIFY’

    You should then be advised that you have successfully authorised the Payee deletion.

    Did this answer your questions?

    Your answer helps us improve our Support Centre
    Thank you for your feedback!